Best 12V Solar Panel Kit for RV (2026): Engineer-Vetted Picks, Sizing & Wiring Guide
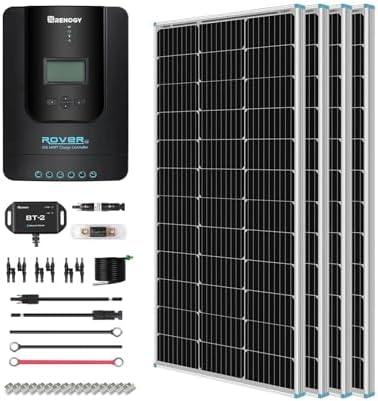
Quick answer: For most travel trailers, fifth wheels and Class B/C motorhomes, the best 12V solar panel kit for an RV is a 400W kit with a 40A MPPT charge controller. It produces roughly 1.2 kWh per day in good sun, which covers a compressor fridge, lights, fans, water pump and device charging for a weekend or a week of boondocking. If you only camp on weekends with light loads, a 200W kit is enough. Our top pick is the Renogy 400W 12V Premium Kit.
Our Top 12V RV Solar Kit Picks at a Glance
| Pick | Kit | Panels | Controller | Best for |
|---|---|---|---|---|
| Best overall | Renogy 400W 12V Premium Kit | 4 x 100W mono | 40A MPPT | Weekly boondocking, most RVs |
| Best expandable | Rich Solar 400W Kit | 2 x 200W mono | 40A MPPT | Limited roof space, room to grow to 600W |
| Best budget | ECO-WORTHY 200W 12V/24V Kit | 2 x 100W mono | 30A PWM | Weekend trips, tight budgets |
| Best turnkey 200W | Renogy 200W 12V Kit with Adventurer controller | 2 x 100W mono | 30A flush-mount | Clean factory-style controller install |
| Best for curved roofs | Renogy 200W Flexible Kit | Flexible mono | Check listing | Airstream-style and curved roofs |
Kit contents and prices change often. Always confirm the panels, controller, brackets and cables on the live listing before you order.
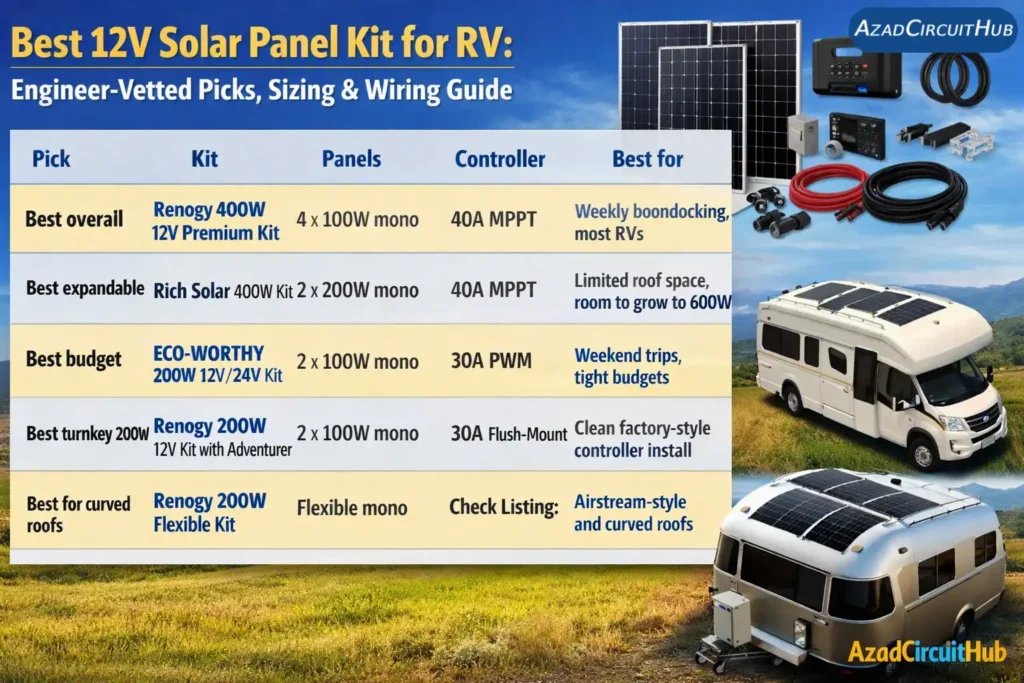
Table of Contents
Table of Contents
Who Wrote This Guide (and Why It Is Different)
I am Abdul Wassay, the founder and lead author of AzadCircuitHub. I have spent more than 15 years as an electrical engineer working on power systems, protection and control, industrial automation (PLC/SCADA) and renewable energy EPC projects. Most of my career has been spent sizing PV arrays, checking string voltages against controller limits, selecting protection devices and designing DC cable runs to IEC and NEC rules.
An RV solar system is a small DC power plant, and the same engineering rules apply: panel voltage must stay inside the controller window, conductors must be sized for current and voltage drop, and every source needs overcurrent protection. Most “best RV solar” lists skip this and simply rank products. This guide gives you the picks and the engineering needed to choose the right size and wire it safely.
How I evaluated each kit:
- Datasheet review: panel Voc, Vmp, Isc, temperature coefficients, and controller input limits.
- System fit: whether the kit works as a true 12V system and how it expands.
- Controller type: MPPT vs PWM, current rating and monitoring features.
- Component quality: MC4 connectors, cable gauge, mounting hardware and warranty terms.
- Value: watts and controller capability per dollar, not just sticker price.
I have not invented lab numbers. Where I give performance figures, they come from standard engineering calculations that you can reproduce yourself below.
Step 1: Size Your RV Solar System Before You Buy
The most common mistake is buying a kit first and discovering later that it cannot cover your loads. Start with a simple energy audit.
Daily load audit (example weekend-to-week RV)
| Load | Power | Hours/day | Energy (Wh/day) |
|---|---|---|---|
| 12V compressor fridge (average duty) | 20 W | 24 | 480 |
| LED lights | 20 W | 5 | 100 |
| Roof vent fan | 25 W | 6 | 150 |
| Water pump | 60 W | 1 | 60 |
| Laptop and phone charging | 50 W | 2 | 100 |
| 12V TV | 40 W | 3 | 120 |
| Total | 1,010 Wh/day |
The sizing formula
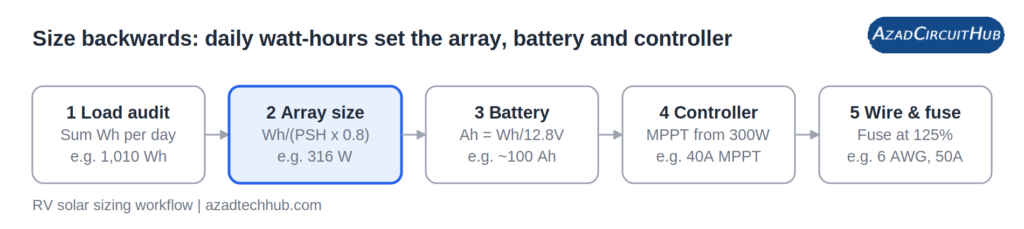
Array watts = Daily Wh / (Peak sun hours x system derating factor)
- Peak sun hours (PSH): about 3 in winter or cloudy northern regions, 4 to 5 in most of the US year-round average, 6 or more in the desert Southwest in summer.
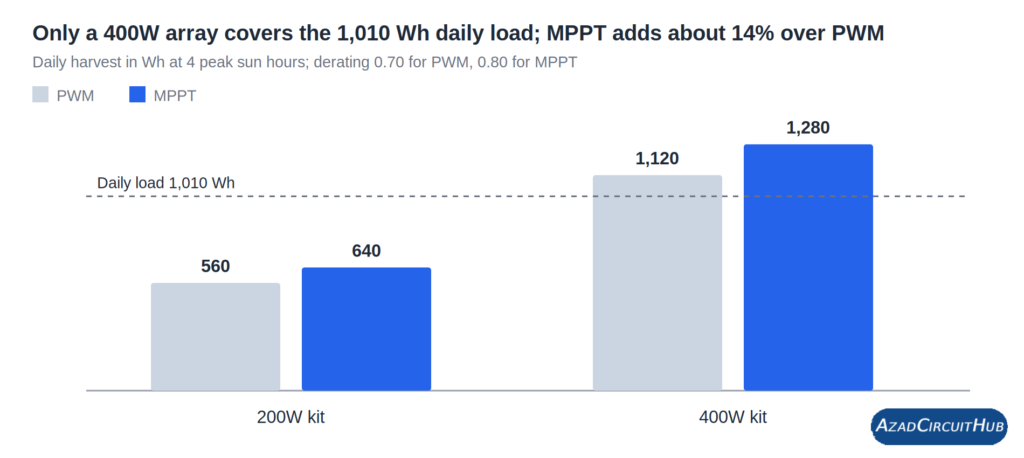
- Derating factor: I plan with about 0.80 for MPPT systems and 0.70 for PWM systems. This covers heat, wiring losses, dust, controller efficiency and non-ideal panel tilt (flat roof mounting).
Worked example (4 PSH):
- MPPT: 1,010 / (4 x 0.80) = 316 W
- PWM: 1,010 / (4 x 0.70) = 361 W
So this RV needs about 350 to 400W of panels, which is exactly why 400W kits are the sweet spot. You can run the numbers for your own loads with our Solar Panel Size Calculator by Load.
Battery bank size for the same RV
- Daily energy in amp-hours: 1,010 Wh / 12.8 V = about 79 Ah per day.
- LiFePO4 (80% usable): 79 / 0.8 = about 100 Ah. One 100Ah LiFePO4 battery gives you one day of autonomy.
- AGM (50% usable): 79 / 0.5 = about 158 Ah, so plan for two 100Ah AGM batteries.
If you plan to run an inverter for AC loads, size it separately with the Solar Inverter Sizing Calculator.
Is a 12V Solar Kit Right for Your RV?
A 12V kit matches the 12V house battery that most RVs already have, so there is no voltage conversion between the controller and your battery. That makes it the simplest and most common route.
Choose 12V when:
- Your RV already has a 12V house battery system.
- Your array is up to about 600 to 800W.
- You want to keep wiring simple and parts easy to find.
Consider 24V or 48V when: your array is above roughly 800 to 1,000W or you are running long cable runs, because current (and cable cost) rises quickly at 12V. A 12V charge controller limits you to its current rating (for example 40A, about 500 to 600W of useful harvest on a 12V battery).
One honest limit: a 12V solar kit alone will not run a roof air conditioner. An RV AC unit draws well over 1,000W while running, which needs a much larger array, a big lithium battery bank and a high-capacity inverter. Solar on a 12V kit is for fridge, lights, fans, pumps, electronics and keeping your batteries topped up.
The 5 Best 12V Solar Panel Kit for RV
1. Best Overall: Renogy 400W 12V Premium Solar Kit (40A MPPT)
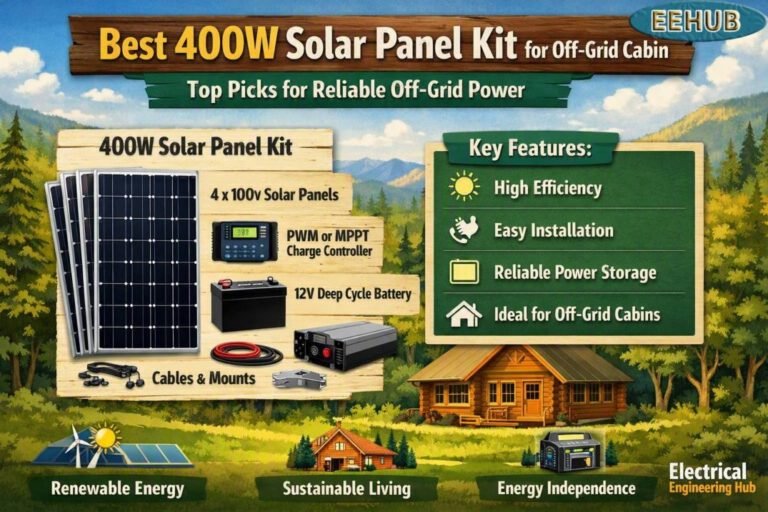
This is the kit I recommend to most RV owners. It is a complete array in a standard 12V format: four 100W monocrystalline panels, a 40A MPPT charge controller, mounting brackets and the cabling needed to get started.
Why it wins:
- 400W is the right size for the audit above (about 1.2 kWh per day at 4 PSH x 0.80 x 400W = 1,280 Wh).
- MPPT harvests more energy than PWM, especially in cold weather and when the battery is partly discharged.
- Four 100W panels are easy to carry up a ladder and fit around roof vents and AC units.
- Easy to expand toward 600 to 800W with the same controller family if you step up to a larger controller.
Engineer’s note: do not wire all four panels in series. Four panels with a typical Voc of about 22V each give roughly 90V in series, and cold mornings push Voc up by around 10%. That brings you to the edge of a 100V controller input limit. Wire them 2 series x 2 parallel (2S2P). You get about 45V per string, plenty of headroom, and better performance when a vent or AC shroud shades one panel.
Pros: right-sized for most RVs, MPPT included, 100W panels are flexible for roof layouts, strong brand support.
Cons: more roof penetrations and connections than two large panels; battery and inverter are not included.
2. Best Expandable: Rich Solar 400W 12V Solar Kit (40A MPPT)
Rich Solar’s 400W kit uses two 200W monocrystalline panels with a 40A MPPT controller, and the manufacturer lists it as expandable to 600W on a 12V system. Fewer, larger panels mean fewer connections and less roof hardware.

- ☀【High Efficiency Solar Panel】With the highest grade monocrystalline solar cells for optimal output, our solar panel is …
- ☀【Simple Installation】Installation is a breeze with our pre-assembled wiring harness that doesn’t require crimping tools…
- ☀【Reliable and Convenient】The digital MPPT charge controller lets you gauge your power with a glance, providing real tim…
Why it is great:
- Two panels means simpler wiring and fewer places for water or corrosion to get in.
- Expansion path to 600W for future needs.
Engineer’s note: check the panel dimensions against your roof before you buy. A 200W panel is much longer than a 100W panel and may not fit around vents or a ladder. Also, if you add panels beyond 480 to 520W on a 12V battery, a 40A controller will clip peak power around midday. A little clipping is fine, but it is the reason larger 12V systems move up to 24V.
Pros: fewer panels, simple installation, expandable.
Cons: large panels are harder to place on crowded roofs; battery and inverter sold separately.
3. Best Budget: ECO-WORTHY 200W 12V/24V Solar Kit (30A PWM)
A straightforward 200W kit for weekend campers. It includes two 100W monocrystalline panels and a 30A PWM charge controller, and the controller supports both 12V and 24V systems.
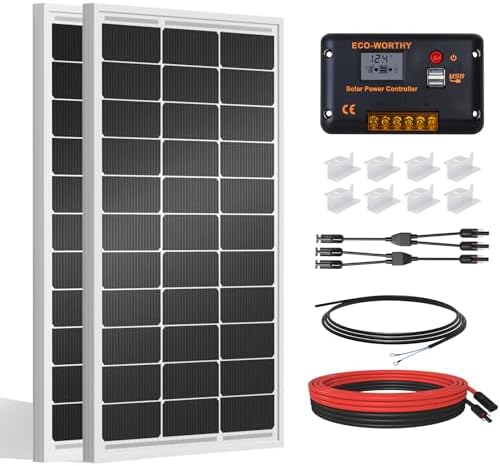
- [Wide Application]: Daily Output 800wh/day under 4 hours full sunshine condition. Perfect for RV, Caravan, Marine, Campe…
- [Excellent Performance]: ECO-WORTHY solar panels use high-performance monocrystalline solar cells, which can provide up …
- [Durable]: Corrosion-resistant aluminum alloy frame, so that the panel can be used for decades, and can withstand strong…
Why it is great: low entry cost, enough to maintain a battery and run a fridge, lights and phone charging on short trips.
Engineer’s note: PWM controllers pull the panel down to battery voltage, so you waste some potential output. For a 200W array on a small system that is acceptable. If you plan to expand beyond 200W later, plan to upgrade to an MPPT controller. My MPPT vs PWM charge controller guide explains when the upgrade pays off.
Pros: lowest cost, easy to install, 12V/24V flexibility.
Cons: PWM harvests less than MPPT; 200W will not cover heavy daily use.
4. Best Turnkey 200W: Renogy 200W 12V Kit with Adventurer Controller
This Renogy 200W kit pairs two 100W panels with a 30A Adventurer controller, which is designed for flush mounting inside the RV. It suits owners who want a tidy, factory-style install and a controller they can read at a glance.

- [Wide Application] 800Wh daily output depends on the 4 hours sunlight availability. This panel is suited for application…
- [Excellent Performance] 22% High solar cell efficiency; Corrosion-resistant aluminum frame for outdoor use, allowing the…
- [Multiple Protection] The Renogy Adventurer-Li 30A PWM charge controller is designed for aesthetically clean flush mount…
Why it is great: clean controller install, trusted brand, and a natural upgrade path from a 100W starter kit.
Engineer’s note: the Adventurer is a PWM-type controller, so the same trade-off as above applies. For a 200W weekend system the simplicity is worth it.
Pros: neat installation, good for smaller trailers and vans.
Cons: PWM, limited headroom for expansion.
5. Best for Curved Roofs: Renogy 200W Flexible Solar Kit
If your RV has a curved or composite roof where rigid frames and Z-brackets will not work, flexible panels are the alternative. They are thin, lightweight and bond directly to the roof.

- 【High Power Output】 Renogy 200w flexible solar panel can provide an average of 1000 Watt-hours of electricity per day (c…
- 【Easy to Transport, Carry and Install】 The 200 watt solar panel suits most curved surfaces as it is bendable within 240 …
- 【Industry-leading Tech】The flexible solar panel is equipped with half-cut PERC cell technology that enhances solar light…
Engineer’s note: flexible panels run hotter because there is no air gap behind them, and heat reduces output and can shorten life. They are a good solution when a rigid panel simply cannot be mounted, not the default choice. Use proper adhesive and seal the edges and cable entry points.
Pros: lightweight, low profile, fits curved roofs.
Cons: typically shorter lifespan than rigid panels, lower efficiency, adhesive installs are harder to reverse.
MPPT vs PWM: Which Controller Should Your RV Kit Have?
The charge controller is the part of the kit that decides how much of your panel power actually reaches the battery.
| MPPT | PWM | |
|---|---|---|
| How it works | Converts higher panel voltage down to battery voltage and adjusts to the maximum power point | Connects panel directly to battery voltage |
| Harvest | Higher, especially in cold weather and low battery states | Lower, voltage mismatch wastes power |
| Cost | Higher | Lower |
| Best for | 300W and above, LiFePO4 batteries, long-term use | 200W and below, short trips, tight budgets |
My rule of thumb: at 300W or more, buy MPPT. The extra harvest and expansion headroom repay the cost. If you want to compare controllers on their own, start with my full MPPT vs PWM solar charge controller guide, the Renogy Rover 40A MPPT review, and the best solar charge controller for LiFePO4 batteries.
How to Wire and Protect a 12V RV Solar Kit Safely
This is where most DIY installs go wrong, and where an engineering background matters. Always follow the manufacturer’s manual and local code (NEC Article 690 in the US).
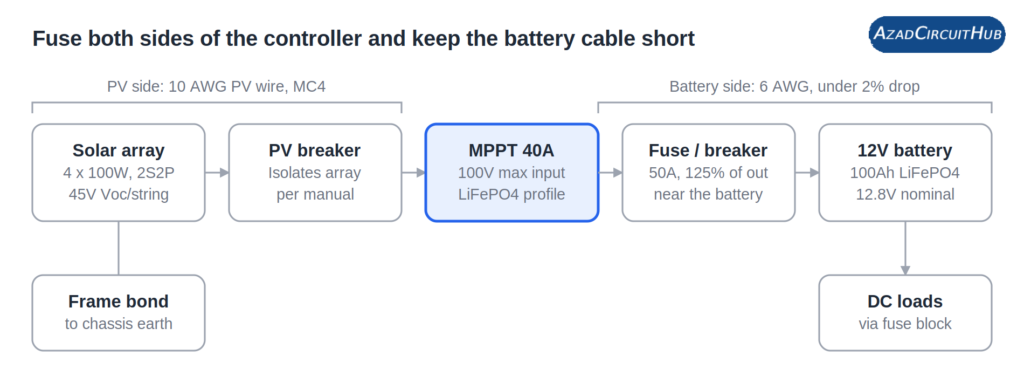
1. Choose the string layout. For a 400W array of four 100W panels, wire 2S2P. Check the controller’s maximum PV input voltage (commonly 100V) against the array’s Voc at the coldest temperature you expect, not just the label value.
2. Use correct PV wiring. Use 10 AWG PV cable with MC4 connectors and a proper crimp tool, not cheap spade or twist connectors. Roof cable entry needs a sealed gland.
3. Add protection on both sides of the controller. A disconnect or breaker on the panel side lets you isolate the array. On the battery side, size the fuse or breaker at about 125% of the controller’s rated output: for a 40A controller that is a 50A device. Fit it as close to the battery as practical.
4. Size the battery cable for current and voltage drop. For a 40A controller, 6 AWG copper is a typical choice. At 30A over a 10 ft run (20 ft round trip), 6 AWG drops about 0.24V, which is under 2% on a 12V system. Check your own run with our DC Cable Size Calculator.
5. Earth and bond correctly. Frame bonding and equipment earthing protect against faults and lightning-induced surges. See my guide on earth cable size for solar panels.
6. Verify before you energise. Measure open-circuit voltage and polarity at the controller input before connecting. A reliable multimeter is the most useful tool you can own for this. See my best multimeter for homeowners picks, or the Fluke 117 review if you want a professional-grade meter.
Essential Accessories That Complete Your RV Solar Setup
Most kits do not include the parts that make a system safe and usable. These are the add-ons I would buy with almost any kit:


- 12V 100Ah LiFePO4 battery: lighter, deeper usable capacity and longer cycle life than AGM. Check LiFePO4 battery prices on Amazon
- MC4 crimping tool and connectors: reliable PV connections need the correct crimp. Check MC4 crimper prices on Amazon
- Battery shunt monitor: shows real state of charge instead of guessing from voltage. Check battery monitors on Amazon
- Inline fuses/breakers and 6 AWG and 10 AWG cable: the protection and conductors described above. Check solar wiring and fuse kits on Amazon
- Clamp meter: to confirm real charging current. See my best clamp meter for electricians guide.
Need AC power for a microwave or laptop charger? Size an inverter with the Solar Inverter Sizing Calculator, and compare complete system options in my guide to the best solar panel kits for home, off-grid and grid-tie.
Common RV Solar Mistakes I See (and How to Avoid Them)
- Buying watts without a load audit. Size from your Wh per day, not from what looks big enough.
- Wiring panels in series without checking cold-weather Voc. This is the one that can damage a controller.
- Undersized cable. Long thin runs lose power as heat and can overheat. Calculate voltage drop first.
- No fuse near the battery. Batteries can deliver very high fault current. Protection is not optional.
- Ignoring shade. One shaded panel in a long series string drags down the whole string. Roof AC units and vents are the usual culprits.
- Expecting solar to run air conditioning. A 12V kit will not.
- Mixing panel types or ratings in one string. Keep matched panels together.
Best 12V Solar Panel Kit for RV: FAQs
What is the best 12V solar panel kit for an RV?
For most RVs the best option is a 400W kit with a 40A MPPT controller, such as the Renogy 400W 12V Premium Kit. It matches typical daily loads of about 1 kWh and gives you a margin for cloudy days.
How many watts of solar do I need for my RV?
Use the formula in this guide: daily Wh divided by (peak sun hours x derating). Weekend campers with light loads can do well with 200W. Boondockers who rely on a compressor fridge, fans, lights and devices usually need 300 to 600W.
Can a 400W solar kit run an RV air conditioner?
No, not by itself. A running RV air conditioner draws well over 1,000W, which needs a much bigger array, a large lithium battery bank and a high-capacity inverter.
Is MPPT worth it for a small RV system?
At 300W and above, yes. At 100 to 200W, PWM can be acceptable if budget is the priority. My MPPT vs PWM guide covers the details.
Can I use a 12V solar kit with a lithium battery?
Yes, provided the controller has a lithium (LiFePO4) charging profile or user-adjustable voltages. Check this before buying.
Do I need to wire panels in series or parallel?
It depends on the controller’s voltage window. Parallel keeps voltage low and tolerates shade better but needs thicker wire. Series raises voltage and cuts current. For four 100W panels into a 100V controller, 2S2P is the safest balance.
What size cable do I need between the controller and battery?
It depends on current and run length. For a 40A controller over a short run, 6 AWG copper is typical. Use the DC Cable Size Calculator to check your exact layout.
Should I insure my RV solar system?
It is worth checking whether your RV policy covers roof-mounted equipment. See my guide on solar panel insurance.
Final Verdict: Which 12V RV Solar Kit Should You Buy?
- Most RVs and regular boondocking: the Renogy 400W 12V Premium Kit is the best all-round choice. Check price on Amazon
- Limited roof space, plan to expand: the Rich Solar 400W Kit. Check price on Amazon
- Weekend camping on a budget: the ECO-WORTHY 200W 12V/24V Kit. Check price on Amazon
- Clean controller install: the Renogy 200W Kit with Adventurer controller. Check price on Amazon
- Curved roof: the Renogy 200W Flexible Kit. Check price on Amazon
Whichever kit you choose, size from your own load audit, check string voltage against the controller limit, fuse both sides, and verify with a meter before you energise.
Related Guides
Disclaimer: This guide is for general information. Final electrical designs should be reviewed by a qualified electrician or engineer and checked against local code.
Get new guides in your feed. Follow Electrical Insights on LinkedIn for new electrical standards guides, calculators and design tips from Azad Circuit Hub.