How to Size a Pull Box: Step by Step Guide
Correctly learning how to size a pull box is essential for safe electrical installations and NEC compliance. A pull box that is too small makes conductor installation difficult, increases cable pulling tension, and may violate NEC 314.28 requirements. Fortunately, the manual process is straightforward when broken into a few logical steps.
This guide explains how to size a pull box using the same process electricians, engineers, and inspectors follow in the field. You’ll learn what information to collect, how to identify the pull type, and how to determine the minimum box dimensions before selecting a standard enclosure. If you want to save time, our Pull Box Sizing Calculator performs all five steps automatically and provides instant results.
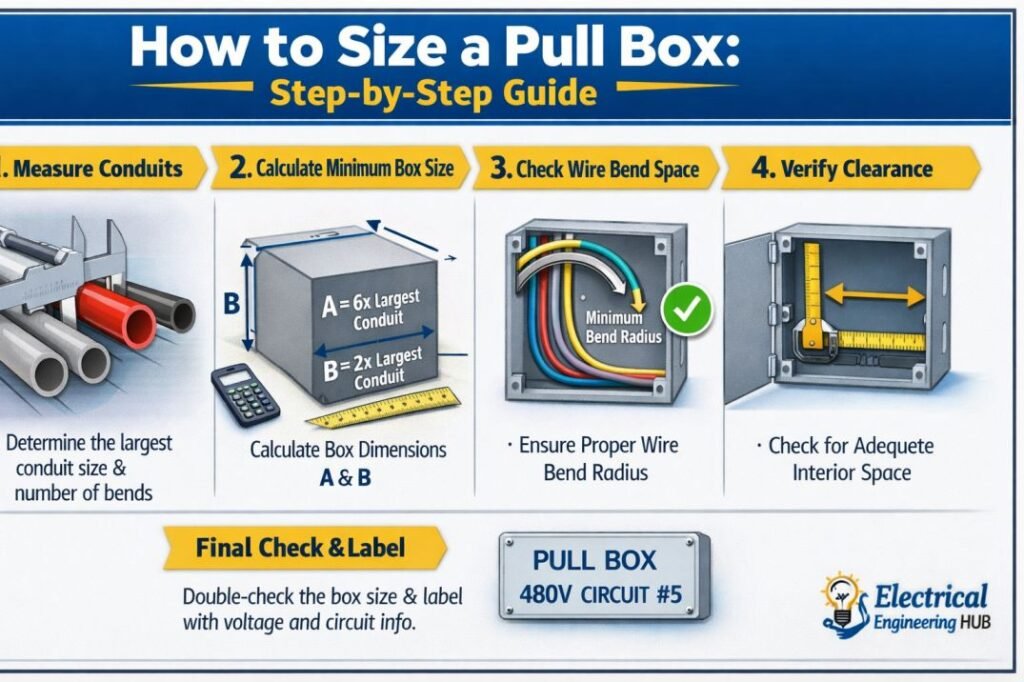
Table of Contents
Table of Contents
Before You Start: What You’ll Need to Know
Before you calculate pull box size, collect the installation details that affect the required dimensions. Having this information ready makes the sizing process faster and more accurate.
You should know:
- The trade size of the largest raceway entering each wall of the pull box.
- Whether the installation is a straight pull, angle pull, or U-pull.
- The number of conduits entering every wall.
- Which conduits contain the same conductors.
- The routing direction of the conductors inside the box.
- The applicable NEC 314.28 requirements.
- The standard pull box sizes available from the manufacturer.
The more accurate your input information is, the easier sizing a pull box becomes. If any conduit sizes are uncertain, verify them before starting the calculation or use the Pull Box Sizing Calculator for a guided workflow.
| Information Required | Why It Matters |
|---|---|
| Largest raceway trade size | Forms the basis of the minimum dimension |
| Pull type | Determines which NEC sizing rule applies |
| Number of raceways | Affects spacing and wall calculations |
| Raceway locations | Helps determine wall dimensions |
| Standard enclosure sizes | Ensures the selected box is commercially available |
How to Size a Pull Box: Step-by-Step Guide
Step 1 — Identify the Pull Type
The first step in how to size a pull box is identifying the conductor path through the enclosure. This determines which NEC sizing rule applies.
A straight pull occurs when conductors enter one side of the pull box and exit directly through the opposite wall without changing direction.
An angle pull requires the conductors to make a 90-degree turn inside the enclosure before exiting another wall.
A U-pull sends the conductors back toward the same side of the enclosure after entering it. Because the conductors bend more sharply, U-pulls typically require additional space.
If you are unsure which category your installation falls into, read our detailed guide on Straight Pull vs. Angle Pull Box Sizing, where each pull type is explained with illustrations and practical examples before continuing with your pull box calculation.
Step 2 — Find the Trade Diameter of the Largest Raceway
The next step in how to calculate pull box size is identifying the largest raceway entering the wall being evaluated.
Do not assume the conduit’s nominal name always represents its actual trade diameter. Manufacturers publish dimensional data that should be used whenever there is uncertainty.
The largest raceway becomes the reference point for determining the minimum wall dimension required by NEC 314.28. Smaller conduits also affect angle and U-pull calculations, but the largest raceway establishes the starting point.
Checking the manufacturer’s specifications before beginning the calculation helps prevent sizing errors that could require replacing the enclosure later.
Step 3 — Apply the Correct Sizing Rule
Once the pull type and largest raceway are known, you can apply the appropriate NEC requirement.
For straight pulls, NEC requires a larger minimum distance across the box because conductors pass directly from one side to the opposite side. The required dimension depends on the largest raceway involved in that pull.
For angle pulls and U-pulls, the calculation is different. In addition to the largest raceway, you must also consider the diameters of the other raceways entering the same wall. This ensures there is enough room for conductors to bend safely without excessive stress.
Each wall of the pull box should be evaluated separately because different conduit arrangements can produce different minimum dimensions.
For a complete explanation of the code requirements, examples, and illustrations, see our detailed guide on NEC 314.28 Pull Box Sizing Requirements. If you prefer an automated solution, the Pull Box Sizing Calculator applies these rules instantly and eliminates manual calculations.
Step 4 — Check Minimum Distance Between Raceway Entries
Sizing the enclosure is only part of the process. You must also verify that raceway entries are spaced correctly inside the pull box.
When multiple conduits contain the same conductors, adequate spacing between entries helps maintain proper bending radius and simplifies conductor installation. Even if the overall box dimensions meet NEC requirements, poor conduit spacing can still create installation problems.
Before finalizing the enclosure, confirm that every raceway entry has sufficient clearance from neighboring entries as well as from the opposite wall.
Step 5 — Round Up to a Standard Box Size
The minimum dimensions obtained during the pull box calculation rarely match a manufacturer’s standard enclosure exactly.
Instead of selecting a custom-sized enclosure, installers normally choose the next larger standard pull box size that exceeds the calculated minimum dimensions.
Never round down simply because the difference appears small. Even a slightly undersized pull box can violate NEC requirements and make conductor pulling more difficult.
For commonly available enclosure dimensions, refer to our Pull Box Sizing Chart before placing material orders. You can also use the Pull Box Sizing Calculator, which recommends the appropriate standard size after completing the calculation.
| Calculated Minimum | Recommended Selection |
|---|---|
| Matches standard size | Select that size |
| Between two sizes | Choose the next larger size |
| Slightly below standard | Never round down |
| Larger future expansion expected | Consider the next available size |
Worked Example: How to Size a Pull Box
Let’s walk through a practical example to understand how to size pull box manually.
Suppose an installation has three conduits entering the left wall of the pull box. Two of them continue toward the top of the enclosure, while the largest conduit exits through the opposite wall. Because some conductors change direction, this installation includes both straight and angle pull conditions.
The first step is identifying the pull type for each conductor path. Next, determine the largest trade size among the conduits entering each wall. That largest raceway becomes the starting point for the required minimum dimensions.
Since multiple conduits enter the same wall, the remaining conduit diameters must also be considered where angle pulls occur. Each wall is checked independently to ensure the enclosure provides enough room for conductor bending and installation.
Finally, compare the calculated minimum dimensions with commercially available pull boxes. If the exact size is unavailable, select the next larger standard enclosure rather than choosing a smaller one.
Instead of performing these checks manually every time, many electricians now rely on the Pull Box Sizing Calculator to complete the same evaluation within seconds.
Skip the Manual Steps — Size Your Pull Box Instantly
Learning how to calculate pull box size manually is valuable, especially when reviewing installation drawings or understanding NEC requirements. However, repeating the same five-step process for every project can take time.
Our Pull Box Sizing Calculator automatically identifies the applicable sizing method, evaluates straight, angle, and U-pull conditions, and recommends the required minimum box dimensions based on NEC 314.28. It also helps reduce calculation errors and speeds up design reviews.
Whether you’re working on commercial, industrial, or utility installations, the Pull Box Sizing Calculator provides a fast and reliable way to size your enclosure while remaining code compliant.
Related Guides & Tools
FAQs
What’s the first step in sizing a pull box?
The first step is identifying whether the installation uses a straight pull, angle pull, or U-pull. The pull type determines which NEC sizing requirement applies to the enclosure.
Do I need to know the pull type before sizing?
Yes. Pull type directly affects the sizing method used under NEC 314.28. Using the wrong category can result in an undersized pull box.
What happens if I use the wrong trade diameter?
Using the wrong trade diameter can produce incorrect minimum box dimensions. Always verify the raceway trade size using manufacturer specifications before completing the calculation.
Can I round down if my box is close to the minimum?
No. Pull boxes should always meet or exceed the calculated minimum dimensions. If the exact size is unavailable, select the next larger standard enclosure rather than rounding down.
Get new guides in your feed. Follow Electrical Insights on LinkedIn for new electrical standards guides, calculators and design tips from Azad Circuit Hub.
HowToSizeAPullBox, #PullBoxSizing, #NEC31428, #ElectricalDesign, #ElectricalEngineering, #ConduitSizing, #ElectricalInstallation, #CodeCompliance, #Electricians, #PowerDistribution