Arduino NEMA 17 A4988: Best Stepper Motor Control
When you first hear about Arduino NEMA 17 A4988, it might seem like just a collection of technical terms. But in reality, this trio forms the backbone of countless exciting projects in robotics and automation. In this article, I’ll guide you through understanding how to control a NEMA 17 stepper motor using an Arduino and the A4988 stepper motor driver.

Table of Contents
Table of Contents
Whether you’re an electronics enthusiast or a complete beginner, by the end of this guide, you’ll be ready to take on your own Arduino stepper motor projects with confidence. Let’s dive in!
What Is the Arduino NEMA 17 A4988 Combination?
Before diving into the details of controlling a NEMA 17 stepper motor with Arduino, let’s break down each component:
1. Arduino Board
An Arduino board is the brain of your project. For this guide, we’ll focus on the Arduino Nano, though you can use other boards like the Uno or Mega. Arduino is an open-source microcontroller platform that allows you to write and upload code to control hardware.
2. NEMA 17 Stepper Motor
The NEMA 17 is one of the most popular stepper motors used in DIY and professional projects. Known for its precision, the NEMA 17 is ideal for applications where movement accuracy is critical, such as 3D printers and CNC machines.
3. A4988 Stepper Motor Driver
The A4988 driver is the intermediary between your Arduino and the stepper motor. It simplifies the control of stepper motors, allowing you to manage speed, direction, and microstepping. Its compact design and reliability make it a favorite among makers.
Why Use Arduino Nano NEMA 17 A4988 Together?
The trio of Arduino, NEMA 17, and A4988 makes it incredibly simple to control stepper motors without delving into complicated circuits. The A4988 driver handles the heavy lifting of power delivery and stepping logic, while the Arduino allows you to program movement patterns and respond to sensors.
How to Control NEMA 17 Stepper Motor with Arduino
Controlling a stepper motor may sound daunting, but I promise it’s not! Follow these steps to set up and control your NEMA 17 motor.
Step 1: Gather Your Components
To start, you’ll need:
- Arduino Nano (or any compatible Arduino board)
- NEMA 17 stepper motor
- A4988 stepper motor driver
- 12V power supply (or voltage suitable for your motor)
- Jumper wires
- Breadboard or soldering tools for connections
Step 2: Wiring Everything Together
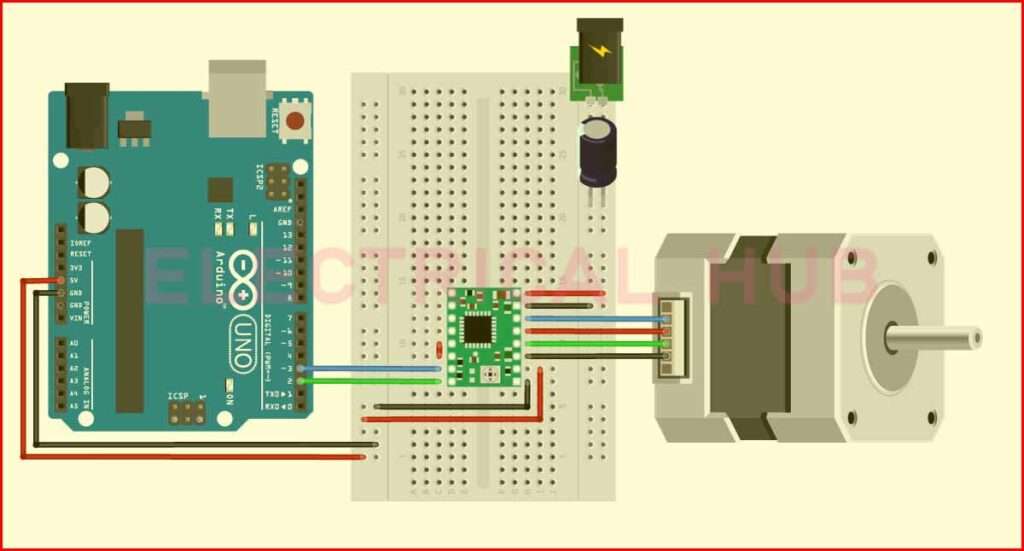
The wiring is where the magic happens. Here’s how to wire the Arduino Nano NEMA 17 A4988 setup:
Power the A4988
Connect VDD and GND of the A4988 to the 5V and GND pins on the Arduino.
Connect the VMOT and GND pins of the A4988 to your external power source.
Connect the Stepper Motor
Attach the two coil pairs of the NEMA 17 motor to the four output pins on the A4988 (2A, 2B, 1A, 1B). Use a multimeter to identify coil pairs if needed.
Connect Control Pins
Connect the STEP and DIR pins on the A4988 to two digital pins on the Arduino (e.g., D2 and D3).
Enable Microstepping(Optional)
For smoother movement, you can enable microstepping by connecting the MS1, MS2, and MS3 pins to HIGH or LOW as per the A4988 microstep table in the datasheet.
Step 3: Write and Upload the Code
Here’s a basic Arduino code snippet to control the stepper motor:
#define STEP_PIN 2
#define DIR_PIN 3

void setup() {
  pinMode(STEP_PIN, OUTPUT);
  pinMode(DIR_PIN, OUTPUT);
  digitalWrite(DIR_PIN, HIGH); // Set direction
}

void loop() {
  for (int i = 0; i < 200; i++) { // 200 steps for one revolution
    digitalWrite(STEP_PIN, HIGH);
    delayMicroseconds(1000);
    digitalWrite(STEP_PIN, LOW);
    delayMicroseconds(1000);
  }
  delay(1000); // Wait 1 second before reversing
  digitalWrite(DIR_PIN, !digitalRead(DIR_PIN)); // Reverse direction
}
This code demonstrates basic movement, but you can modify it for more complex patterns, like stepper motor position control.
Optimizing Your Setup
Setting the Current Limit on the A4988
One crucial step in configuring your setup is setting the A4988 current limit. This ensures your motor gets enough power without overheating the driver. Use the reference voltage (VREF) and a small screwdriver to adjust the potentiometer on the A4988.
Improving Precision with Microstepping
The A4988 supports microstepping, allowing finer control of the stepper motor. Set the MS1, MS2, and MS3 pins accordingly for the desired resolution. For example:
| MS1 | MS2 | MS3 | Microstepping Mode |
|---|---|---|---|
| LOW | LOW | LOW | Full Step |
| HIGH | LOW | LOW | Half Step |
| HIGH | HIGH | HIGH | 1/16 Step |
Common Issues and Troubleshooting
Even with the best intentions, things can go wrong. Here are some common issues you might face:
1. Motor Not Moving
- Check all connections and ensure the coils are correctly identified.
- Verify your power supply matches the motor’s requirements.
2. Motor Vibrating But Not Rotating
- This usually happens if one coil is not connected properly. Double-check the wiring.
3. Driver Overheating
- Ensure you have set the current limit correctly.
- Add a heat sink or fan to the A4988.
Expanding Your Projects
Once you have mastered this basic setup, the possibilities are endless. You can explore topics like:
- Using A4988 stepper motor driver with ESP32 for wireless control
- Comparing DRV8825 vs A4988 for advanced stepper motor applications
- Designing projects with 28BYJ-48 A4988 setups for smaller motors
These advanced projects will not only challenge you but also open doors to new automation ideas.
Final Thoughts
The combination of Arduino NEMA 17 A4988 is powerful yet beginner-friendly. It’s perfect for learning the basics of stepper motor control while offering enough flexibility for complex projects. Whether you’re building a simple rotating platform or a high-precision robotic arm, this guide gives you the foundation to get started.
Keep experimenting and exploring! And don’t forget to check out my other posts on related topics like A4988 pinout, Arduino stepper motor projects, and more for deeper insights.
Follow Us on Social:
Subscribe our Newsletter on Electrical Insights for latest updates from Electrical Engineering Hub
#Arduino, #NEMA17, #A4988, #StepperMotor, #MotorControl, #DIYProjects, #Electronics, #MakerCommunity, #Robotics, #3DPrinting, #OpenSource, #CircuitDesign, #Microcontroller, #Automation, #Engineering


